Sunday, 3 March 2019

Fix iPhone Stuck on Charging Screen or Battery Logo


While using your iPhone and observing the battery is going to dead, you got your charger and started charging it. After a while, you unplug your device from the charging cable and still see the iPhone stuck on battery logo and unable to use the device. If this is the case, check the troubleshooting tips we have listed below that can be performed to fix the problem. Read carefully while performing them and make your iPhone out of that red battery screen.


5 Tips to Fix iPhone Stuck on Charging Screen or Battery Logo

Also Read:Delete the Downloaded iOS Update on iPhone/iPad (iOS 12)

Sponsor ads:Fix Audio Issues on Windows 10 with 5 Methods that Work in 2019


1. Put Your iPhone into DFU Mode and Charge with a Original Charger and Cord


2. Set Your iPhone into Recovery Mode and Force Restart Your iPhone Next Day


3. Fix iPhone Stuck on Battery Logo without Data Loss


4. Restore iPhone using DFU Mode via iTunes (Data Loss)


5. Change the Battery at Apple Store
1. Put iPhone into DFU Mode and Charge with a Original Charger and Cord

When your iPhone stuck on battery screen, you can put it in the DFU mode and later try charging it. To do this, here is the guide.


Connect your device to your PC firstly and then hold down the 'Power' button along with 'Home' button if you use iPhone 6 and earlier iPhone model ('Volume Down' button if you have iPhone 7 or 7 Plus). After 10 seconds, release the 'Power' button ('Volume Down' button ) but keep holding the other one until you see the black screen indicating that your device is connected to iTunes. Your iPhone now is in DFU mode.


In order to put iPhone 8/8 Plus/X in DFU mode, you need to connect iPhone to PC and give a quick press to 'Volume Up' button followed by 'Volume Down' button. Now press the 'Power' key for 10 seconds and when the screen goes black, release it and then immediately hold down 'Volume Down' and 'Power' buttons together for nearly 5 seconds. At the end, release the 'Power' button and continue to hold the 'Volume Down' button for 5-7 seconds until iTunes show you that the device is detected and the screen turns black.


Once your device is in DFU mode, wait for a while and disconnect your device from the PC. Take your charger (make sure it is original one) and start charging your device. In such cases your iPhone uses way less energy mainly because the display stays off. Wait for about half an hour and then reboot the iPhone in order to have it properly booted.

Note: In this article, you will need to perform the steps to put your device into DFU mode or Recovery mode in several tips. If the steps are not clear for you, check the guide here.
2. Set iPhone into Recovery Mode and Force Restart Your iPhone Next Day

If still your iPhone is stuck on red battery screen, follow this method to get out of the problem.


Connect your iPhone to your Mac or PC and start holding down the 'Home' and 'Power' buttons simultaneously until you see the 'Connect to iTunes' screen. For iPhone 7/7 Plus, hold down 'Power' and 'Volume Down' keys together until iTunes logo appears.


The iPhone 8/8 Plus/X users are required to press 'Volume Up' button then 'Volume Down' button. Subsequently, long press 'Power' button until you see the same 'Connect to iTunes' screen.


These steps will take your device in recovery mode. Keep your device like this and the next day, force restart it to see if you can fix the issue.
3. Fix iPhone Stuck on Battery Logo without Data Loss (iOS 11.4 Supported)

If you're concern about your data being lost, the perfect option you can go with is iMyFone iOS System Recovery. This third-party tool is the most compatible one having the power to fix all major iOS issues including iPhone stuck on charging screen. The tool is fully secure and provides three professional modes that can help you fix your device stuck on home screen, Apple logo, boot loop and so on. It can fix these iOS issues without data loss. It is completely easy to use and requires no special technical skills to solve the issue. Let us see how you can make your device back to normal.Also Read:How to Make a Folder Password Protected
Also Read:5 Ways to Transfer Files from iPhone to Mac without iTunes
Also Read:How to Fix iPhone Volume Low in the Music App

How to Fix YouTube App Black Screen on iPhone 2019

How to Fix YouTube App Black Screen on iPhone 2019

As we all know, YouTube is an exceptionally useful app that can fulfill your needs of entertainment. In fact, most of the iPhone users spend considerable amount of time with YouTube app every day. Like many other apps, however, even YouTube tends to malfunction occasionally due to one reason or other. That being said, YouTube black screen with audio is one of the most common errors experienced by most of the iPhone users.

Every day, thousands of iPhone users across the globe perform internet searches asking the question “how to fix YouTube black screen on iPhone” and that indicates how common this issue is. In fact, YouTube app black screen is a really annoying experience for any iPhone user. Many iPhone users tend to frustrate after seeing YouTube black screen with audio. Well, you don’t have to worry anymore about YouTube black screen issue anymore. Here this article explains how to fix it!


Part 1: How to Fix YouTube App Black Screen on iPhone


Part 2: Backup before Fixing YouTube App Black Screen iPhone


Part 3: Related Tips on YouTube Black Screen
Part 1: How to Fix YouTube App Black Screen on iPhone

From this point onwards, let’s take a look at the ways to fix iPhone YouTube black screen.


Force Quit YouTube & Restart Your iPhone/iPad


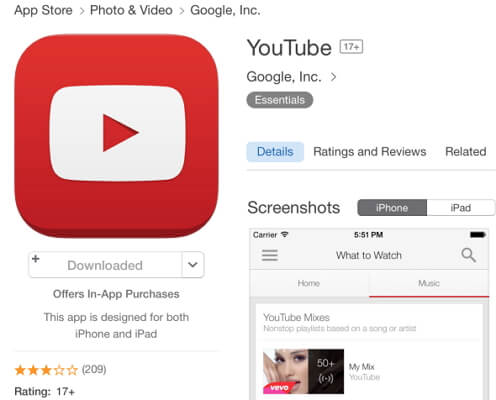
Reinstall YouTube with The Latest Version


Check Network Connection


Fix YouTube App Black Screen on iPhone/iPad via Third-Party Tool
1 Force Quit YouTube & Restart Your iPhone/iPad

In most of the cases, YouTube black screen can be fixed simply by force quitting YouTube and restarting the iOS device that has the issue. Here’s how to do it.
Force Quit YouTube & Restart iPhone 8 or older versions

Force Quit


Tap on the home button twice and the device will display the most recently used apps.


Swipe the screen to find YouTube app.


Close the app simply by swiping up the preview of the app.


Force Restart


Press the top (or side) button and hold it.


After slider appears, drag it to turn the device off.


Then, press and hold the same button (side or top) to restart the device followed by the Apple logo on the screen.


Force Quit YouTube & Restart iPhone X

Force Quit


You should swipe up and pause from the home screen.


Then, touch and hold firmly on the app you need to force quit.


If not, you can simply swipe up the apps to close them.


Force Restart


Press side button and volume up or down button simultaneously hand hold them.


Once the slider appears, drag it to turn off the device.


Then, press the same button (side or top) button and hold it to restart the device followed by the apple logo on the screen.


2Reinstall YouTube with The Latest Version

If the previous remedy didn’t work, you should then try to update YouTube app or uninstall the existing YouTube app and reinstall the latest version. Here’s how to do it.
To update YouTube

Go to the App Store and Tap the Updates. Then, you will be able to locate the YouTube option. If there is an update available for the app, it will be displayed.


To Uninstall and Reinstall YouTube

If there is no update available for YouTube and iPhone YouTube black screen persists, you should try reinstalling the app. Once the app is reinstalled, you will be able to sign in back using your old credentials.


3Check Network Connection

You can try checking the network connection if the YouTube black screen continues to appear. No matter whether you use cellular data or Wi-Fi data, the connection must be strong if you use YouTube. After all, YouTube works seamlessly on strong networks and tend to give some trouble on slower networks. So, you should be sure if your network connection is strong enough to run video streaming. To get it verified, you should:


Turn off both cellular and Wi-Fi data on the iPhone or iPad.


On your device, you should reset the network settings related Wi-Fi or cellular network.


After the resetting is done, you should connect the device on Wi-Fi or Cellular data network.


4Fix YouTube App Black Screen on iPhone/iPad via Third-Party Tool

For those who wonder how to fix YouTube black screen, here’s a very easy option to try. To do this, you will need the assistance of software tool called iMyFone iOS System Recovery. Sponsor ads:

Gihosoft Free iPhone Data Recovery:https://www.gihosoft.com/iphone-data-recovery-free.html

Gihosoft iPhone Data Recovery Free

Free iPhone Data Recovery Software for Windows/Mac

Recover up to 12+ types of files, including contacts, SMS, photos, WhatsApp, Viber, notes, etc.

Restore lost data from iOS devices directly or from iTunes and iCloud backup

Recover iPhone data lost due to iOS upgrade/jailbreak, accidental deletion, device lost or broken

Support all the latest iPhone, iPad and iPod Touch

Both Free and Pro version.

If you lost data after you updated to a new iPhone, you can always use Gihosoft iPhone Data Recovery to get the data back from the old iPhone or backup.You may also like: iphonerecovery.com

If you use android phones, please choose Gihosoft Android Data Recovery.

With Gihosoft Android Data Recovery, no longer afraid of data loss!

Must read:Youtube video downloader for pc

Gihosoft RePicvid Free Photo Recovery Software provides a free photo recovery software for windows to help users recover the deleted or lost photo for free.

Jihosoft Android Data Recovery: the best Android Data Recovery software for Windows and Mac to recover deleted contacts, messages, photos, videos, WhatsApp and etc from Android devices.Tips:How to transfer messages from iPhone to iPhone

jihosoft Free iPhone Data Recovery

Friday, 1 March 2019

How to Fix an iPhone Not Sending Pictures


Part 1: How to Fix an iPhone Not Sending Pictures?

If your iPhone is behaving and not letting you share your special pictorial memories with your loved one, here are four ways you can fix it. Let’s look at them one by one:
Method 1: Check iMessage

Also Read:How to Access and Unlock Android Phone with Broken Screen

Also Read:Top 7 Best Websites to Convert AVI to MP4 Free Online 2019

If you’re struggling to send pictures using iMessage because of a frozen “send button” or blue link color, then your problem is likely due to one of the below reasons:
-Network connectivity problem

Also Read:XD Card Recovery – Recover Deleted Photos from xD-Picture Card

Also Read:How to Convert SWF to MP4 on Mac or Windows

Also Read:7 Best iPhone Photo Editor Apps To Achieve Filter and Psychedelic Look

Also Read:5 Best Free Movie Streaming Sites like Pubfilm to Watch Movies Online 2019

iMessage works when the internet connection is available to send messages. If your internet connection is unavailable or weak, the messages will not go through.

Solution: Go to Settings>Wi-Fi to, or go to Settings>Cellular turn on your wireless network.


- Server problem

If the server is down, you will not be able to send pictures using iMessage. This is a popular reason for iPhone not sending pictures.

Solution: Use this link to check the iMessage status. If there’s an iMessage outage, the information will be displayed on the link. If the server is down, you can only wait for it to become functional.
Method 2: Check MMS

If your iPhone is not sending pictures when you’re using MMS, it’s highly likely that MMS is not switched on in the “Settings” section.

Follow the below steps to turn on MMS settings:


Go to “Settings”, then click on “Messages”.


Find MMS Messaging tab and check if it is turned on or off.


In case the MMS Messaging is switched off, turn it on using the slider.


If MMS Messaging is switched on, then the issue is most likely with your network career. Get in touch with them to resolve the iPhone not sending pictures.


Method 3: Reset your Network

Another prevalent reason is weak cellular network. This will most likely happen if you’re somewhere underground or in a low network signal area.

Try getting access to an area with a strong cellular network and see if you’re able to send the pictures. If your iPhone is still unable to send pictures, the last resort is “Network Reset.”

Follow the steps below to “Reset Network Settings:”


Open “Settings” and click on “General”.


Select the “Reset” option.


Next, click on “Reset Network Settings”.


Confirm if you wish to “Reset Network Settings”.


Try sending the pictures again once your network settings have been reset.Sponsor ads:


Gihosoft Free iPhone Data Recovery:https://www.gihosoft.com/iphone-data-recovery-free.html


Gihosoft iPhone Data Recovery Free


Free iPhone Data Recovery Software for Windows/Mac


Recover up to 12+ types of files, including contacts, SMS, photos, WhatsApp, Viber, notes, etc.


Restore lost data from iOS devices directly or from iTunes and iCloud backup


Recover iPhone data lost due to iOS upgrade/jailbreak, accidental deletion, device lost or broken


Support all the latest iPhone, iPad and iPod Touch


Both Free and Pro version.


If you lost data after you updated to a new iPhone, you can always use Gihosoft iPhone Data Recovery to get the data back from the old iPhone or backup.You may also like: iphonerecovery.com


If you use android phones, please choose Gihosoft Android Data Recovery.


With Gihosoft Android Data Recovery, no longer afraid of data loss!


Must read:Youtube video downloader for pc


Gihosoft RePicvid Free Photo Recovery Software provides a free photo recovery software for windows to help users recover the deleted or lost photo for free.


Jihosoft Android Data Recovery: the best Android Data Recovery software for Windows and Mac to recover deleted contacts, messages, photos, videos, WhatsApp and etc from Android devices.Tips:How to transfer messages from iPhone to iPhone


jihosoft Free iPhone Data Recovery


Method 4: Restart your iPhone

The best and the simplest way to check an iPhone not sending pictures is by restarting it. Once you restart your iPhone, try sending the pictures again.

If you are still unable to send pictures, try method 1, 2 or 3.

Wednesday, 27 February 2019

How to Find iPhone Ringtones After Transferring Them to iTunes?


How to Find iPhone Ringtones After Transferring Them to iTunes?

After you transfer and sync iPhone ringtones to iTunes, you can start to locate those ringtones on your iTunes. iTunes restores ringtones in a fixed location in the file system. Therefore it is easy for you to find iPhone ringtones after ringtones syncing.

Where are iPhone ringtones stored on computer?

Sponsor ads:Help You Download Private Facebook Videos

Sponsor ads:How to Remove RAR Password Online in Windows without Software 2019

In Mac OS X, ringtones are located in ~/Music/iTunes/iTunes Media/Tones/


In Windows, ringtones are located in \My Music\iTunes Media\Tones\ (Place might vary depending on which version of Windows you are using.)


How to locate those iPhone ringtones?


Finder: Hit Command+Shift+G and enter “~/Music/iTunes/iTunes Media/Tones/” as the path (This method works on Mac OS X ).


iTunes: Open iTunes, go to Tones tab, and right click on any ringtone and choose "Show in Finder" (This method works both on Mac and Windows ).


With methods mentioned above, you now know where your iPhone ringtones are and how to find them. The next movement for you is to enjoy your ringtone to the fullest.
You may also like:Sponsor ads:

Gihosoft Free iPhone Data Recovery:https://www.gihosoft.com/iphone-data-recovery-free.html

Gihosoft iPhone Data Recovery Free

Free iPhone Data Recovery Software for Windows/Mac

Recover up to 12+ types of files, including contacts, SMS, photos, WhatsApp, Viber, notes, etc.

Restore lost data from iOS devices directly or from iTunes and iCloud backup

Recover iPhone data lost due to iOS upgrade/jailbreak, accidental deletion, device lost or broken

Support all the latest iPhone, iPad and iPod Touch

Both Free and Pro version.

If you lost data after you updated to a new iPhone, you can always use Gihosoft iPhone Data Recovery to get the data back from the old iPhone or backup.You may also like: iphonerecovery.com

If you use android phones, please choose Gihosoft Android Data Recovery.

With Gihosoft Android Data Recovery, no longer afraid of data loss!

Must read:Youtube video downloader for pc

Gihosoft RePicvid Free Photo Recovery Software provides a free photo recovery software for windows to help users recover the deleted or lost photo for free.

Jihosoft Android Data Recovery: the best Android Data Recovery software for Windows and Mac to recover deleted contacts, messages, photos, videos, WhatsApp and etc from Android devices.Tips:How to transfer messages from iPhone to iPhone

jihosoft Free iPhone Data Recovery

Tuesday, 26 February 2019

How to Backup iTunes Library


How to Backup iTunes Library

Following are some ways to backup iTunes Library:
1. Backup the Whole iTunes Library

You can back up your entire iTunes library by following these simple steps:

Step 1: make sure that iTunes is closed before proceeding to other steps.

Step 2: You will need to locate the iTunes folder on your computer’s hard drive. Depending on the version of your Windows, you will find this folder in one of these locations:


Windows Vista, 7, 8: \users\username\Music


Windows XP: Documents and Settings\Username\My Documents\My Music.

Step 3: Once you have located the folder, copy it and then paste it in your desired location on the hard drive. You can also copy this folder to an external hard drive in the same way.


Sponsor ads:

Gihosoft Free iPhone Data Recovery:https://www.gihosoft.com/iphone-data-recovery-free.html

Gihosoft iPhone Data Recovery Free

Free iPhone Data Recovery Software for Windows/Mac

Recover up to 12+ types of files, including contacts, SMS, photos, WhatsApp, Viber, notes, etc.

Restore lost data from iOS devices directly or from iTunes and iCloud backup

Recover iPhone data lost due to iOS upgrade/jailbreak, accidental deletion, device lost or broken

Support all the latest iPhone, iPad and iPod Touch

Both Free and Pro version.

If you lost data after you updated to a new iPhone, you can always use Gihosoft iPhone Data Recovery to get the data back from the old iPhone or backup.You may also like: iphonerecovery.com

If you use android phones, please choose Gihosoft Android Data Recovery.

With Gihosoft Android Data Recovery, no longer afraid of data loss!

Must read:Youtube video downloader for pc

Gihosoft RePicvid Free Photo Recovery Software provides a free photo recovery software for windows to help users recover the deleted or lost photo for free.

Jihosoft Android Data Recovery: the best Android Data Recovery software for Windows and Mac to recover deleted contacts, messages, photos, videos, WhatsApp and etc from Android devices.Tips:How to transfer messages from iPhone to iPhone


jihosoft Free iPhone Data Recovery

6 Tips to Fix Bluetooth Issues with iPhone X and iPhone 8


Common Bluetooth Issues with iPhone Like iPhone X/8

Here are some common Bluetooth issues with iPhone X and iPhone 8 people can meet :


First problem could be the failure of Bluetooth connection between car and iPhone X or iPhone 8.
Must Read:If you lost data after you updated to a new iPhone, you can always use Gihosoft iPhone Data Recovery to get the data back from the old iPhone or backup.

Sometimes, you can experience a problem where Bluetooth stuck at searching for a device and unable to find it.


Another issue could be that you are not able to pair devices at all even when the device is perfectly available. Sometimes, the device gets stuck with a single device and doesn't connect with the other devices even when there are more choices.


You may also encounter a problem with the device being disconnected and reconnected loops which can be frustrating.


With iPhone X, people also have complained about the connection issue with the same Bluetooth device which is working perfectly fine with their older iOS devices.
6 Tips to Fix Bluetooth Issues with iPhone X and iPhone 8


Tip 1. Forget the Device & Re-pair the Device


Tip 2. Hard Reset iPhone X/8 and the Other Device


Tip 3. Reset Network Settings


Tip 4. Reset All Settings


Tip 5. Use a Third-party Tool


Tip 6. Get Help at Apple Store

The tips below can also be used for the other devices like iPhone 7, iPhone 6, iPhone 5, iPad Pro, iPod touch and more.
1. Forget the Device & Re-pair the Device

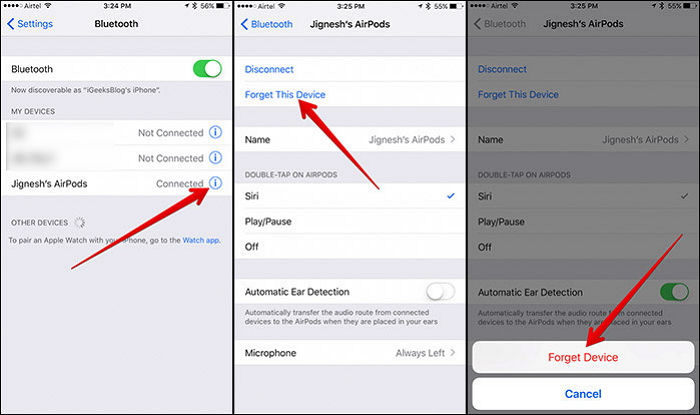
When getting Bluetooth issues with iPhone X and iPhone 8, you can try fixing this issue by forgetting the Bluetooth device which cannot be connected. Then reconnect it and the problem will probably be removed. Here are the steps to do this which are quite simple.


Take your iPhone 8/X and tap "Settings".


Open "Bluetooth" now and you will receive a list of Bluetooth devices.


Subsequently, look for the "i" icon beside the device you are getting problems with.


Tap on the "i" icon followed by tapping on "Forget This Device" option.


Confirm the action and re-pair the device once again.


2. Hard Reset iPhone X/8 and the Other Device

If the above solution wasn't fruitful, attempting hard reset has been helpful in most of the cases and resolved many issues with iOS devices. Thus, you should try this if you are stuck with Bluetooth problems with iPhone X and iPhone 8. Also, it is to be noted that the steps for this has altered for iPhone 8/8 plus/X. So, here are the new steps.


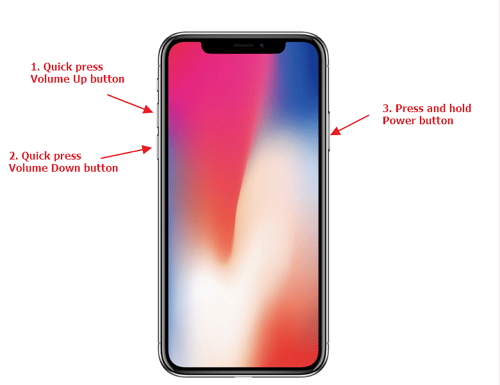
In your device, press Volume Up button and release it quickly.


After this, repeat the step with Volume Down button.


Lastly, keep pressing and holding the Sleep/Wake button located on the side until you spot the Apple logo in your device's screen.


Those were the steps to hard reset your iPhone 8/X. About the other device you are trying to connect, please also try to restart it. Follow the steps and see if you still get Bluetooth problems with iPhone X and iPhone 8. If unfortunately yes, try the following tips and get rid of the problem.
3. Reset Network Settings

You can also go for resetting your network settings when any Bluetooth issues with iPhone X and iPhone 8 pop up. This will positively result in removing all your network settings like Wi-Fi passwords, VPN settings etc. And you will require to add your settings again. The steps are:


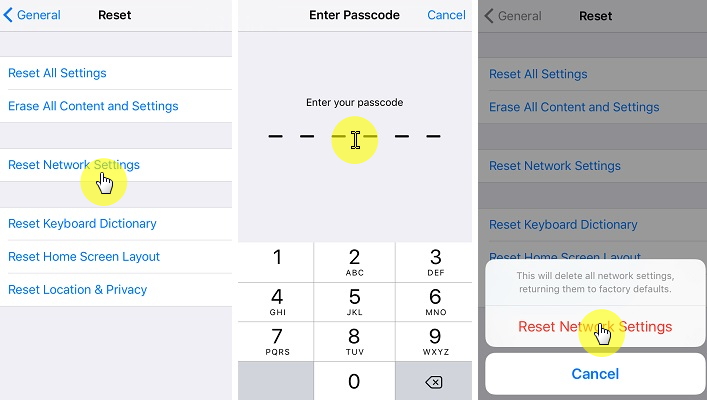
Tap "Settings" in your device and go to "General".


Now, tap on "Reset" and then "Reset Network Settings".


Enter your passcode when asked and tap again on ‘Reset Network Settings" to confirm the move.


When done, try re-connecting the Bluetooth device again. See if it works otherwise move to the next solution.
4. Reset All Settings

Here is the next method to resolve Bluetooth problems with iPhone X and iPhone 8. The method will lead to reset all your changed and preferred settings to the default one. Let's have a glimpse on the steps below.


Open "Settings" in your respective iPhone.


Go to "General" and tap "Reset"


Move to the "Reset All Settings" option. Tap on it and type in your passcode.


Lastly, confirm it by again hitting on "Reset All Settings".


5. Use a Third-party Tool


Sponsor ads:

Gihosoft Free iPhone Data Recovery:https://www.gihosoft.com/iphone-data-recovery-free.html

Gihosoft iPhone Data Recovery Free

Free iPhone Data Recovery Software for Windows/Mac

Recover up to 12+ types of files, including contacts, SMS, photos, WhatsApp, Viber, notes, etc.

Restore lost data from iOS devices directly or from iTunes and iCloud backup

Recover iPhone data lost due to iOS upgrade/jailbreak, accidental deletion, device lost or broken

Support all the latest iPhone, iPad and iPod Touch

Both Free and Pro version.

If you lost data after you updated to a new iPhone, you can always use Gihosoft iPhone Data Recovery to get the data back from the old iPhone or backup.You may also like: iphonerecovery.com

If you use android phones, please choose Gihosoft Android Data Recovery.

With Gihosoft Android Data Recovery, no longer afraid of data loss!

Must read:Youtube video downloader for pc

Gihosoft RePicvid Free Photo Recovery Software provides a free photo recovery software for windows to help users recover the deleted or lost photo for free.

Jihosoft Android Data Recovery: the best Android Data Recovery software for Windows and Mac to recover deleted contacts, messages, photos, videos, WhatsApp and etc from Android devices.Tips:How to transfer messages from iPhone to iPhone


jihosoft Free iPhone Data Recovery

Monday, 25 February 2019

Fix iPhone Messages App Crashing in iOS 12 2019

Fix iPhone Messages App Crashing in iOS 12 2019
Tip 2. Reboot Your iPhone

In many of the occasions, it is easy to fix the freezing issue of the device by resetting. Therefore, it is preferable to use this little trick before proceeding with an advanced option that will fix the messages app freezing issue on your iPhone.

Step 1. Hold the on/off button along with the home button for about 10 seconds or until you see the Apple logo appear on the screen.


Step 2. To switch on your iPhone 7 and 7 Plus, hold the on/off button along with the volume down key.


Step 3. To start your iPhone X, 8, and 8 Plus, quickly press and release the volume up button at first and the volume down button at next. Now hold the on/off button until the Apple logo appears.


Tip 3. Reset All Settings on Your iPhone

Resetting the device is always painful as it will delete the entire content from the device. However, if the iPhone is crashing consistently in iOS 12, resetting the device to the factory settings is preferable.

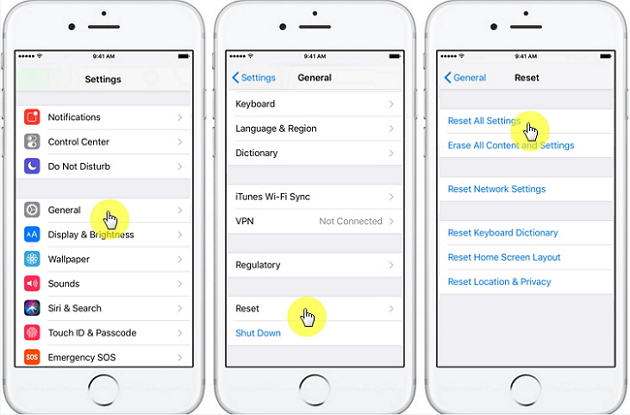
1. Open the Settings application on the device, and tap General.

2. In the next window, scroll down the list, and choose Reset. In the subsequent window, click Reset All Settings option.

3. The device will ask you to confirm the action. Choose Reset All Settings once again. The operating system will once again ask you to confirm, as it will restore the device to the factory settings. Click Reset All Settings option.

4. After completion, you can set up the device right from scratch.


Tip 4. Use 3D Touch to Access Messages

If your iPhone crashes each time you wanted to access messages for a particular contact, then it is necessary to understand the underlying problem. To begin with, launch the application using 3D touch. Hold the icon until it displays the recent contacts. From the list, choose the content that you wish to send a message and swipe a little above. Touch the reply button and continue the conversation. In such cases, the issue is with a particular contact. A better way to overcome the situation is by deleting the entire conversation belonging to that particular contact. Hopefully, it will help in fixing the iPhone messages app crashing on iOS 12.


Tip 5. Clear App Caches

If you are still in search for the solution of solving iPhone messages app crashing on your phone, then you can look forward to cleaning up the cache of iMessage. Before clearing the cache, it is preferable to create a backup. An advantage of using iOS 12 is that you can automatically delete older conversations. Additionally, you can view the attachments of a conversation along with the space consumption. Clearing the cache will help in freeing space and improve the performance of the application.


Tip 6. Force Quit Message App and Relaunch

Bring up the app switcher by clicking the Home button twice. Swipe the messages application card to force quit it. You can immediately turn off the device and restart after a few seconds. Relaunch the application and check whether it is performing as efficiently as it should.Sponsor ads:Factory Reset Your iPad without Passcode or iTunesMust Read:If you lost data after you updated to a new iPhone, you can always use Gihosoft iPhone Data Recovery to get the data back from the old iPhone or backup.

Gihosoft Free iPhone Data Recovery:iphonerecovery.com

If you use android phones, please choose Gihosoft Android Data Recovery

Kuo: All Three 2020 iPhones Will Feature 5G Connectivity

Reputed analyst Ming-Chi Kuo says in his latest note that all three iPhones which Apple plans to launch in 2020 will feature 5G connectivity...